

Non omnes vagi perditi sunt
Non omnes vagi perditi sunt


 WARNING Geeky stuff ahead!
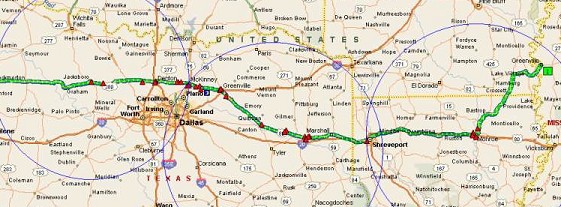
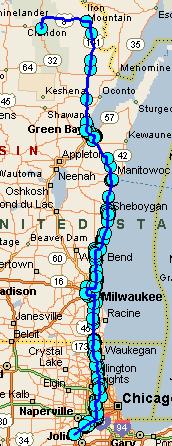 Why go to all of this trouble? Why go to all of this trouble?I tested something specific as I worked on this FAQ. I created a route (right) that went from my home to Laona, WI, but I specifically wanted to test the limits of the system. The dots are the resulting caches against my dark blue Free Form path. But I also had the route take a detour around a stretch of interstate in Milwaukee. Here's the results: 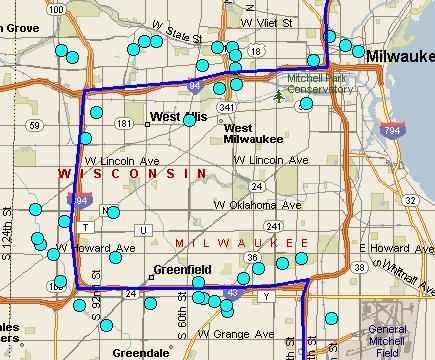 Just for fun, I forced a route that matched it, and had S&T produce that "cloud" that forms when you say "find points near route" and I specified 1 mile - exactly the same as I did with the PQ. 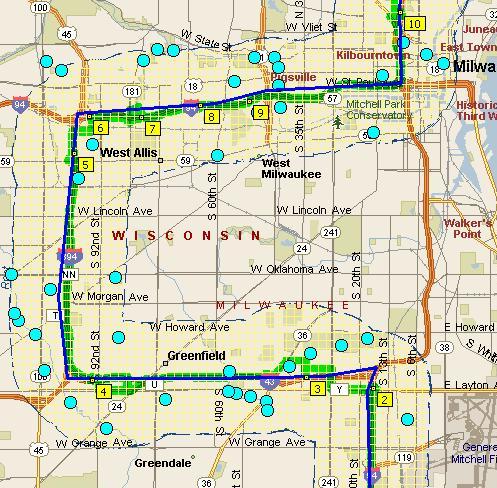 You can see that it followed the Free Form object and not the route. So the possibilities of CUSTOMIZING your route to not take the path that Google Earth forces are endless! |


|
 There are maps of caches on Geocaching.com. First, pick a cache near where you're starting, and click the link to "find ...all nearby caches." When you get the results, you'll see an icon in the upper right of the results page (see image to the left). Click it and you'll see the cache and the other caches in the area on a map. If you are a premium member, these maps can pan and zoom. You can also have it identify caches on the map as well and go straight to the cache page.
| Here's an example. I'm leaving Joliet, Illinois to go to St. Louis on Interstate 55. I can choose a cache near I-55 in Joliet (Patrick's Pot Of Gold is a good one), and click find ...all nearby caches. When I click the Map It! icon, I'm taken to a map of the area, showing the cache you started from and any other caches in the area. I can "pan" the map down I-55 and periodically identify the caches that interest me, creating a list as I go. It's time consuming, especially once you identify the caches and try to get them into your GPS. But it is available. |  |
 Geocaching.com has also installed Google Maps on their pages. If your are running in the PC world, and have cable, this is definitely the way to go. If you find a cache near your starting point, you can click on the Nearby Caches link, click on the Map It! icon and click the link for the Beta Google Maps. In that save region I started with before, I can start with this Google Map Interface and identify the caches. I can drag the map and zoom it, and even bookmark. Very cool enhancement. Geocaching.com has also installed Google Maps on their pages. If your are running in the PC world, and have cable, this is definitely the way to go. If you find a cache near your starting point, you can click on the Nearby Caches link, click on the Map It! icon and click the link for the Beta Google Maps. In that save region I started with before, I can start with this Google Map Interface and identify the caches. I can drag the map and zoom it, and even bookmark. Very cool enhancement. |
Google Earth and the Geocaching.com KML File Geocaching.com also has something for its premium members called the "Geocaching KML" file. Google Earth is a great software available from Google that you download and can zoom all over the planet in startling resolution and with high accuracy*. It does require a PC and you will want a cable modem or DSL for internet speed. The Geocaching KML file, when opened, will show Geocaches when you get down close enough to the planet. Geocaching.com also has something for its premium members called the "Geocaching KML" file. Google Earth is a great software available from Google that you download and can zoom all over the planet in startling resolution and with high accuracy*. It does require a PC and you will want a cable modem or DSL for internet speed. The Geocaching KML file, when opened, will show Geocaches when you get down close enough to the planet.First, you'll need to go to Google Earth and download and install the software. Play around for a while with the zoom, the pan, the tilt (and see it in 3D!) and the route directions. Then go to your own My Cache Page and the premium features tab to download the Geocaching.com KML file. What that file does is allow an overlay of Geocaches on to Google Earth. Once it's downloaded, start up Google Earth and click file open and find the Geocaching KML. It should start overlaying. There are some limitations. The views will only show 150 caches at a time. If there's too many, it shows 150 RANDOM caches, so be sure to zoom in. The other limitation is that the Google Earth overlay will only query the database 200 times per day, and the default is that every time the map stops, that's a view. Eeek.  So, after starting up Google Earth and starting the KML overlay, there's a setting to change. Right click on the overlay in the panel to the left and click edit, then select "Refresh Parameters" and click OK. Then the Geocaching KML file will not refresh until you right click the link in the panel and say "Refresh". That way, YOU control the page views and can be more selective about what you want to actually show for the caches. Another little tip is that the TYPES of caches are listed as subsets in the panel to the right (traditional, letterbox, multi, puzzle, etc.). You can deselect viewing them in the current view. It won't hold that deselection (to only query traditionals for example), but that does help if you're looking for good caches that match your type. So, after starting up Google Earth and starting the KML overlay, there's a setting to change. Right click on the overlay in the panel to the left and click edit, then select "Refresh Parameters" and click OK. Then the Geocaching KML file will not refresh until you right click the link in the panel and say "Refresh". That way, YOU control the page views and can be more selective about what you want to actually show for the caches. Another little tip is that the TYPES of caches are listed as subsets in the panel to the right (traditional, letterbox, multi, puzzle, etc.). You can deselect viewing them in the current view. It won't hold that deselection (to only query traditionals for example), but that does help if you're looking for good caches that match your type.A key to understanding just how powerful this tool is understanding Bookmarks. Bookmarks are a premium feature on Geocaching.com where you can have a list of caches. You can have multiple lists and each list can have multiple caches. You can also share these bookmarks with other cachers, or use them to create a Pocket Query of the caches. So if there's an interface to allow you to pick and choose caches and add them to a bookmark list, then later you can get those results from a Pocket Query. There's three settings for bookmark lists:
 So - back on Google Earth, once you find the caches you want to find, click on them, and you'll get a little pop-up window that tells you more information about the cache - difficulty/terrain, and the size of the container. You can click it and either visit the cache page, or bookmark it and add it to the list. So - back on Google Earth, once you find the caches you want to find, click on them, and you'll get a little pop-up window that tells you more information about the cache - difficulty/terrain, and the size of the container. You can click it and either visit the cache page, or bookmark it and add it to the list.In December of 2005, I tried this out - using the I-55 corridor from Route 52 in Joliet to St. Louis, a stretch of about 253 miles (408 km). It took me about 45 minutes to an hour to travel down the corridor and bookmark some 40 caches that were readily accessible to exits or rest stops, and create this publically viewable Bookmark list. Pretty cool. * HOWEVER, while the Google Earth interface is extremely accurate, the coordinates for the Geocaches if taken from the KML file are NOT. They are purposely rounded and off a little, as Geocaching.com really wants you to go to their online database to get the actual cache information. However, Google Earth CAN also open up GPX files. These GPX files contain precise coordinates, and are therefore correctly mapped on the Google Earth maps. So, pick your caches using the KML and the bookmarking list, then get the GPX through a pocket query. If you then open the GPX file on Google Earth, it will correctly show your caches on your route. |


| November 29, 2004: Putting it into practice... | |
I just set up five pocket queries to match the following criteria... • Maximum Difficulty of • Maximum Difficulty of  • Maximum Terrain of • Maximum Terrain of   • Not Multi-stage or Unknown or Virtuals• All containers except micros• Is Active, I don't own, I haven't found • Not Multi-stage or Unknown or Virtuals• All containers except micros• Is Active, I don't own, I haven't foundWith that in mind, I carefully selected slightly overlapping regions for a trip I'll be taking soon to visit my in-laws. I tested the PQ results online first to make sure I wasn't hitting over 500. Got it all down to exactly what I wanted and got the GPX files e-mailed to me. I then pushed the results into MS Streets and Trips and did the route. The results: 86 caches within 1 mile of my route - 49 caches within a half mile of my route. Now I'll be looking for the ones that are close to exits or rest areas. Final assessment: it works! | |
| March 30, 2006: Putting Google Earth into practice... | |
|
For a trip to Washington, D.C. from Chicago, I started off using the Pocket Query method, but I quickly hit a snag as I approached our pass through Cleveland. So I used that portion of the trip through the Google Earth solution and created a Private Bookmark list of cache that I thought would be easily accessible along our route. Combining this method with the Pocket Query method, I was able to take a laptop that had GSAK and Streets and Trips, and a hookup to my GPS and see where we were on the route, and pick and choose geocaches along the way. I received the final list of GPX files the day before we left so that I had the most current information possible on the road. It all worked like a charm! | |
Last Updated: June 4 2007


 Type this: cd c:\myfiles\st2gpx - and hit the enter key. The screen should look similar to the image on the right